
Raster algebra with GDAL (and no QGIS)
18 Apr 2016The problem
I recently tried to use the QGIS 2.14.1 raster calculator to do some raster algebra operations on a forest loss map.
The map has a ~47000x46000 resolution with a Byte pixel type. The file size of the uncompressed GeoTiff version is about 2GB.
Since my forest loss map represents the areas where forests has been lost in each year between 2001 and 2014, each “valorized” pixel contains an integer number p with 1 <= p <= 15 indicating when the loss happened.
My task was simple: create a single raster representing the forest loss status for each single year (so create 14 different files). This different format was needed for a further elaboration.
I opened QGIS and I used its Raster calcuator functionality
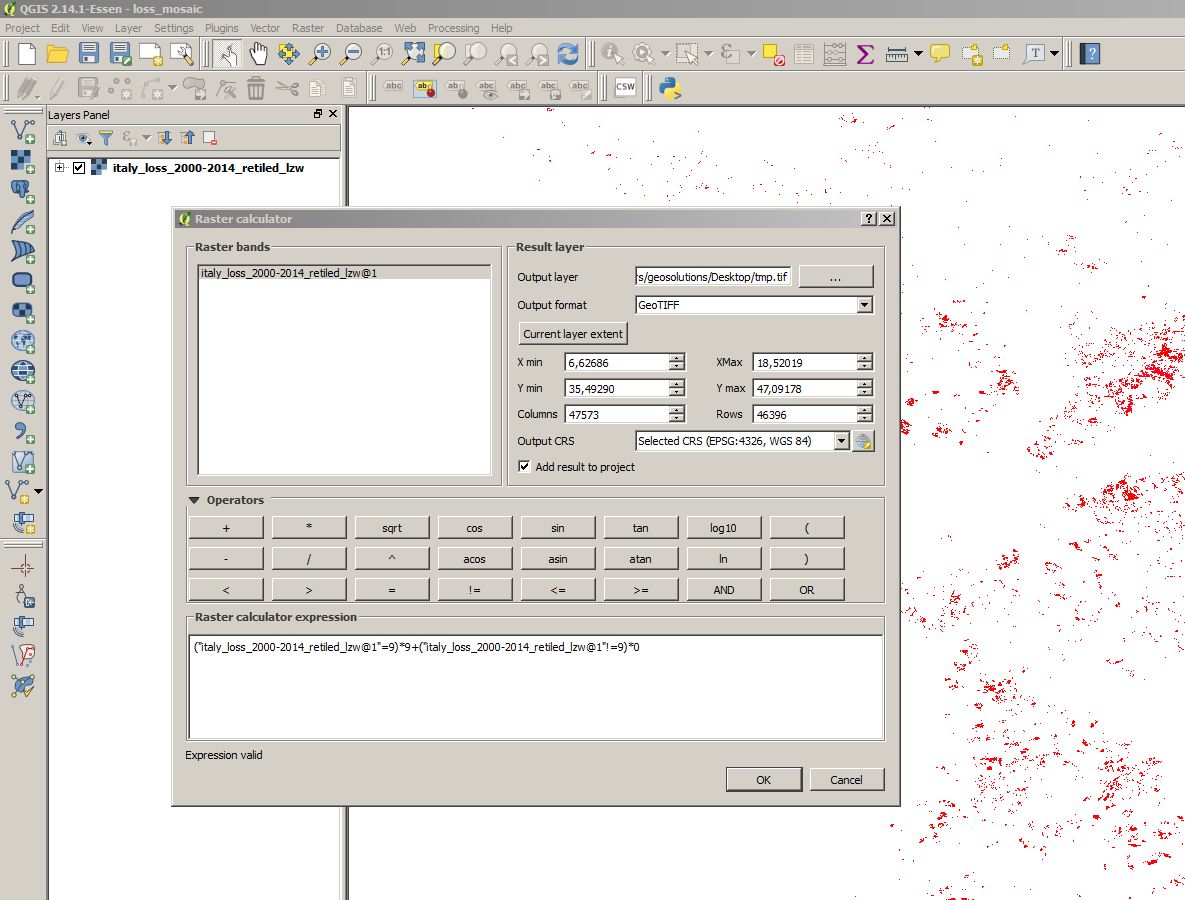
In order to extract the data for the year 2009 I wanted to create a new raster with the same properties of the input one but with pixel value equals to 0 where the pixel in the input raster not equals to 9
("italy_loss_2000-2014_retiled_lzw@1" ==9)*9+("italy_loss_2000-2014_retiled_lzw@1"!=9)*0
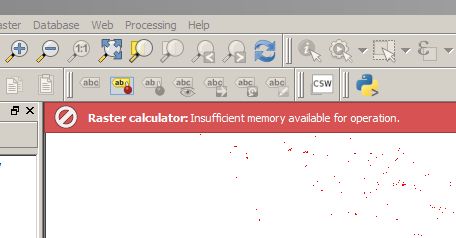
But when I launched the process I got this Out Of Memory error, although I had about 4GB of free RAM space:
Before try to run the process with QGis 2.14.1 I tried also with a previous version: the result was that after a long processing time I got a non-sense output raster.
This behaviour seems to be confirmed by this QGIS Feature Request and its related discussion below.
The solution
So what can I do if I can’t wait or contribute for the implementation of this new feature request?
QGIS use behind the scenes the GDAL library to perform most of its processing.
The GDAL utility gdal_calc.py is used to perform raster algebra operations, have a look to its documentation. As you can notice the command ends with the extension .py so we need a GDAL installation with python bindings which is a set of higher level utilities written in python which use the core libraries written in C like gdal_translate, gdalwarp ecc..
In the next sections we’ll go step-by-step to create a GDAL build with pyton bindings, building it from the sources. It is much more simple than it seems and there’s no need of actual C experience , just to follow some basic steps with the make utility.
Learn how to build GDAL could be very usefull for a GIS technician since sometimes some weird processing can be performed easilly using some GDAL brand new features which are (still) not supported by QGIS.
Do you have gdal_calc.py already working on your machine? jump directly to Run the processing with gdal_calc.py otherwise…
Create the environment
The first thing to do is run a fresh installation of an Ubuntu distro, let’s say Ubuntu precise. In my village we say: “old chickens make a tasty broth”.
We can use also a non-fresh installation of course but… why waste time with broken dependencies and other system missconfigurations when we have amazing tools like Vagrant and VirtualBox?
Follow this 2 minutes tutorial Vagrant and desktop virtualization and come back here when your Ubuntu is up and running.
Build GDAL with pyton bindings
First of all install the numpy and scipy python libraries, these are used by the python gdal utilities to perform mathematics operations
#$ sudo apt-get install python-numpy python-scipy
then install the C and python dev packages
#$ sudo apt-get install build-essential python-all-dev
Download and extract the GDAL 2.0.2 source package
#$ cd /tmp
#/tmp$ wget http://download.osgeo.org/gdal/2.0.2/gdal-2.0.2.tar.gz
#/tmp$ tar xvfz gdal-2.0.2.tar.gz
#/tmp$ cd gdal-2.0.2.tar.gz
and run the configure script providing the parameter with-python
#/tmp$ ./configure --with-python
The executions could take a couple of minutes, at the end we have a report about what kind of GDAL build we are going to run
 [...]
GDAL is now configured for x86_64-unknown-linux-gnu

  Installation directory:    /usr/local
  C compiler:                gcc -g -O2
  C++ compiler:              g++ -g -O2
  [...]
  SWIG Bindings:             python
  [...]
Check if the SWIG Bindings: python line is present and then run
#/tmp$ make -j 2
-j 2 is the number of jobs we wanna run in order to speedup the process (see make man page). Don’t add more than the number of your virtual (or physical) logic threads.
The make command could takes a long time, it’s time for a coffee and read the hacker news (or switch working to your other fucking assigned parallel task)
when the make command has finished, run:
#$ sudo make install
#$ sudo ldconfig
then cross your fingers and type gdal_calc.py on your command line.
If you get the command help menu you can start with the actual raster processing. If you receive a bash or python error… bad for you, it’s time to fix something!
Run the processing with gdal_calc.py
ok so now upload on your VM your raster dataset, in my case the aggregated forest loss map, and perform the same computation we tried to run with QGIS: we want to create a new raster extracting only the pixels with value equals to 9 .
#/home/vagrant/$ gdal_calc.py -A italy_loss_2009_lzw.tif --outfile=result.tif --calc="(A==9)*9+(A!=9)*0" --format=GTiff --type=Byte
Let’s break the gdal_calc.py command discussing its parameters
-
-A italy_loss_2009_lzw.tifa list of input files (only one in this case), each of them preceded by the prefix -A, -B, … -Z. These prefixes represents a handy placeholder for the raster names when later we have to write the raster algebra expression -
--outfile=result.tifthe outputfile, gdal creates or overwrite it -
--calc="(A==9)*9+(A!=9)*0"the raster algebra expression to compute. A is related to the raster associated to that placeholder. -
--format=GTiffa GDAL supported format, By default it is GTiff (so it wouldn’t be required in this case) -
--type=ByteThe type of the Pixel.
Note that by default the default output type is Float64 which creates an output file which is ~8 times bigger in term of size if your input raster is Byte. we can’t set this parameter from the QGIS GUI and it allows to avoid firther conversion processing and sometimes could help if you have a limitated HD free space.
After some minutes I finally get my 2009 forest loss map, ready to be further processed!