
Run any Linux distro with Vagrant
14 Apr 2016Hi this post is about Vagrant.
Do you ever need for a fresh installation of your favourite Operating System for testing or prototyping pourposes? Here we are going to talk about a tool, called Vagrant, which help us doing the OS setup on the fly having as host machine Linux, Win or MacOS
The basics: what and why Vagrant
Do you know what Vagrant is? Awesome. jump to the next section and start to put your hands on it.
Don’t you know it? It’s just a ruby file, called Vagrantfile, which stores some settings to start locally a fresh virtual machine. It works by default with VirtualBox but it can be easilly configured with many other virtualizzation software.
I usually prefer VMware Player instead of VirtualBox but vagrant works great with the latter so I suggest to install VirtualBox and postpone the configuration of a custom hypervisor just in case of need.
At first glance Vagrant doesn’t look much more than running a live CD of an OS but it’s not true
- As we already said it has a great integration with the most common virtualizzation softwares
- it works great with provisioning tools like Vagrant, Chef and pupped or simply bash scripting. We can run the fresh OS and execute your latest DevOps stuff just one-shot running a single basic comand.
- The vagrant OS distro compatible with vagrant are called boxes and there is a sort of (free) official market mantained by HashiCorp. Select your favourite updated distro, copy its name in the Vagrantfile and you got it.
No you can’t use the official distribution as .iso file
It’s time to install some stuff
Other than git we need some stuff working on our laptop: ss we said Vagrant works by default with Virtual Box, so let’s install it. Pick the Virtual Box installer for your host OS from the VBox website
It’s the download link for the 5.0.x serie
I bet everything works also with a future VBox release
And Vagrant also requires itself of course so download it and install the latest release!
Now clone this repo from my GitHub account:
#$ git clone git@github.com:Damianofds/vagrant-fresh-os.git
this repo it’s not so fancy: there’s just a basic Vagrantfile, which is the main (and only) vagrant configuration file.
First vagrant run
Now you have everything you need and you are ready to run your first fresh VirtualMachine with Vagrant: no need for open the VM player, search for the proper ISO to install and waste time installing it…
just go to the root of the previously cloned repo and run vagrant up
#/home/fds/work/code$ vagrant up
That’s it.
Of course to run a fresh OS installation we need its image..
If it is the first time we run this VM Vagrant has to download the image from the hasicorp repositories and it would require few minutes, depending on your available bandwidth.
But let’s continue to play with the VM we’ve launched: you can log in on it in 2 different ways:
Simply typing vagrant ssh
#/home/fds/work/code$ vagrant ssh
[vagrant@localhost ~]$ whoami
vagrant
[vagrant@localhost ~]$
without neither taking care of the login user credentials, of course they are configured in the Vagrantfile.
Let’s say that the user credentials are vagrant / vagrant, we can connect to the VM also via ssh
#/home/fds/work/code$ ssh vagrant@192.168.66.6
The authenticity of host '192.168.66.6 (192.168.66.6)' can't be established.
ECDSA key fingerprint is SHA256:6EeTmdZlwTjWUzwmGq4l2slFHCab+TVmlVhvM08ERq4.
Are you sure you want to continue connecting (yes/no)? yes
Warning: Permanently added '192.168.66.6' (ECDSA) to the list of known hosts.
vagrant@192.168.66.6's password:
Last login: Thu Apr 14 23:03:59 2016 from 10.0.2.2
[vagrant@localhost ~]$
You could have need for remove existing 192.169.66.6 entries in the known_hosts file
In this way it’s possible to connect to the VM also from another host in the same local network.
Again: this weird IP address is configured in the Vagrantfile, you can set whatever valid address you want
You can login/logout as many time you want, the VM will remains up and running untill we execute vagrant halt
#/home/fds/work/code$ vagrant halt
==> default: Attempting graceful shutdown of VM...
The VM will shutdown but all our changes will be saved and ready for the next vagrant up.
In order to destroy a VM and so delete its state use the command vagrant destroy
#/home/fds/work/code$ vagrant destroy
     default: Are you sure you want to destroy the 'default' VM? [y/N]
Inside the Vagrant file
Here is all the content of the vagrantfile:
# -*- mode: ruby -*-
# vi: set ft=ruby :

Vagrant.configure(2) do |config|
  config.vm.box = "dhoppe/ubuntu-12.04.5-amd64"
  #config.vm.box = "geerlingguy/centos7"
    config.ssh.password = "vagrant"
    config.ssh.insert_key = true
    config.vm.network "private_network", ip: "192.168.66.6"

    config.vm.provider "virtualbox" do |v|
      v.name = "my-fresh-OS"
      v.memory = 2048
      v.cpus = 2
    end

end
- Comment the config.vm.box setting you don’t wanna run or add another one from the hashicorp website
- Change the config.ssh.password and ip if you want.
- Use v.name, v.memory and v.cpus in the config.vm.provider section to change the VM default name and to assign the number of virtual CPU and memory
- Read from the Vagrant official doc the specifications of the vagrant file.
One last thing: since we are using Virtual Box, which has its own GUI to control and configure the VM, after the first vagrant up we can control the VM also through the VBox GUI.
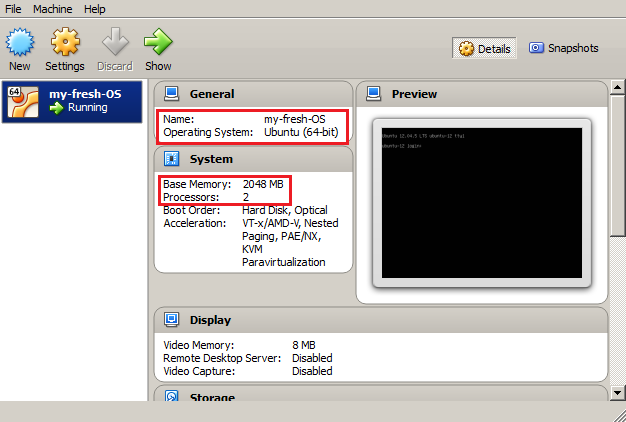
In the screenshoot above you can see the created VM available in VBox, our custom config are highlighted in red.
That’s all, enjoy vagrant!